From Command Prompt - image NTLDR-BOOTMGR-GRUB
If you can’t boot into Windows 10 to run chkdsk, download Easy Recovery Essentials – our recovery disk for Windows 10 – and run Automated Repair or Command Prompt directly. You can burn EasyRE on CDs, DVDs or USBs.
To run it from Command Prompt, here are the instructions:
- Log into Windows 10
- Press the Windows key to open the Start Menu
- Select Search
- Type-in
cmd - Right-click on Command Prompt from the
search results list
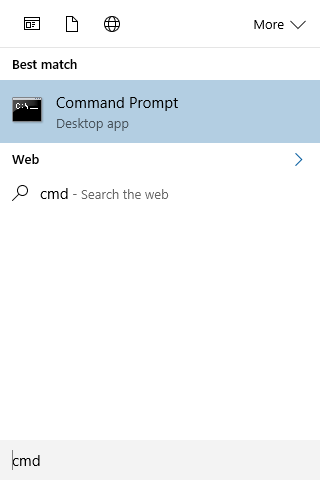
- Click Run as administrator
- Log in as an Administrator
- When Command Prompt launches, type the command:
chkdsk C: /f /r /x
The parameters for this command are:
/foption will attempt to fix any found errors/roption will locate for bad sectors and recovery any readable information/xoption will force the volume you’re about to check to be dismounted before the utility begins a scanIf the
C:drive is in use, typeYto run a scan at your PC’s next restart. If so, exit Command Prompt and restart the computer.
From My Computer
If you can’t boot into Windows 10 to run chkdsk, download Easy Recovery Essentials – our recovery disk for Windows 10 – and run Automated Repair or Command Prompt directly. You can burn EasyRE on CDs, DVDs or USBs.
To run the check disk utility from Computer (My Computer), follow these steps:
- Boot into Windows 10
- Double-click on Computer (My Computer) to open it
- Select the drive you want to run a check on, e.g.
C:\ - Right-click on the drive
- Click Properties
- Go to the Tools tab
- Select Check, at the Error checking section
- If you receive the following message, click Scan
drive to begin the scan:
You don't need to scan this drive

We haven't found any errors on this drive. You can still scan the drive for errors if you want.

Scan Drive
- You can keep using the drive during the scan. If errors
are found, you can decide if you want to fix them. Depending
on the results of this scan, the utility will report the
results:
- If no errors were found, you’ll see this message:
Your drive was successfully scanned
Windows successfully scanned the drive. No errors were found.
- If errors were found, you’ll see this message
instead:
Restart your computer to repair file system. You can restart right away or schedule the error fixing on next restart.
- If no errors were found, you’ll see this message:
From the installation disc
If you don’t have the installation disc to run chkdsk, download Easy Recovery Essentials – our recovery disk for Windows 10 – and run Automated Repair or Command Prompt directly. You can burn EasyRE on CDs, DVDs or USBs.
If you can’t boot into Windows 10 to run Command Prompt, you can use the original Windows 10 installation disc to run Command Prompt from there.
To do so, follow these instructions:
- Insert the installation disc
- Restart your computer
- Press any key to boot from the disc, at the “Press any key to boot from CD or DVD…” message
- Choose your keyboard layout
- Select your language, time and a keyboard method
- Click Next
- Click Repair your computer
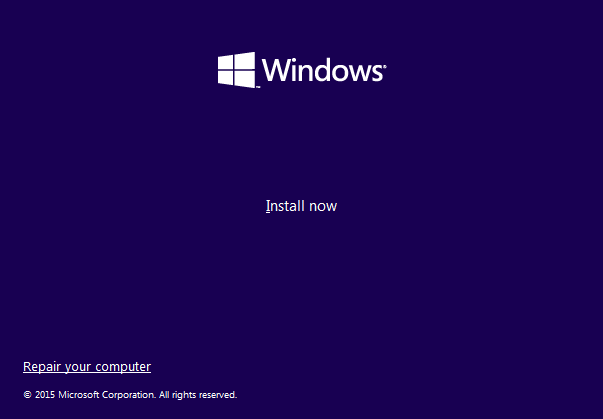
- At the Choose an option screen, click Troubleshoot

Commands and parameters
The check disk utility has several parameters that you can use:
/c – applicable to a NTFS volume only
/f – this option fixes errors on a volume
/i – applicable to a NTFS volume only. This
option performs a check of index entries
/r – this option also implies the /f
and /p option. This option locates the bad sectors
of your hard drive and recovers any readable information
Depending if you run the utility from Command Prompt or Recovery Console, the following parameters are different:
/p – this fixes any errors on a volume. In your
standard Command Prompt /p is only read-only
The mandatory requirement of this utility is the volume you’re about to check must not be locked. If a volume you’re about to scan is locked, you’ll receive this message:
Chkdsk cannot run because the volume is in use by another process. Would you like to schedule this volume to be checked
the next time the system restarts? (Y/N)
If so, type Y and press Enter to perform a scan at the next boot of your system.
Download chkdsk
chkdsk can’t be downloaded as it’s a command available with Windows. You can use the original installation disc to run the utility tool.
You can download Easy Recovery Essentials and open Command Prompt to run specific chkdsk commands:
You can burn Easy Recovery Essentials to CDs, DVDs or USBs and run Command Prompt.
- Download Easy Recovery Essentials
- Burn the ISO Image. Follow our instructions on how to burn a bootable ISO image. If you’d like to have a recovery USB instead, follow our instructions on how to make a recovery USB.
- Boot into the recovery media
- Select Launch Command Line
Troubleshooting
Cannot continue in read-only mode
If you receive the “Errors found. CHKDSK cannot continue
in read-only mode.” error message after running a check
disk command, make sure you run the command with the /r
parameter:
chkdsk /f
If the disk check utility must be ran on another volume, update the command with the letter of the drive you want to run a scan for:
chkdsk D: /f
Cannot run because the volume is in the use by another process
If you receive this error message when running the tool:
Chkdsk cannot run because the volume is in the use by another process. Would you like to schedule this volume to be checked the next time the system restarts.
You need to type Y to make sure the utility runs at the next boot. If so, type Y, restart the computer and let the tool to perform the scan.
Cannot lock current drive
If the check disk utility shows the “Cannot lock current drive.” error message, make sure the command you’re performing has the /r option:
chkdsk /r
If this doesn’t work, try disabling System Restore for the entire session you’re trying to run a scan and other protection software, such as: antivirus, firewall, spyware etc.
Another alternative command is:
chkdsk C: /f /r /x
stop chkdsk on every boot
If the utility runs a scan at every boot without stopping, you can try a few solutions.
Before you follow the instructions below, make sure you let the scan to be 100% completed and then restart your computer.
If the check disk runs again, even if the previous scan was 100% complete, continue with the steps below.
Fix #1: Check if there is a scheduled scan. To do so, follow these steps:
- Open Command Prompt
- Type
chkntfs c:, wherec:is the letter of the drive you ran a check - Press Enter
- If the message is the following, then a check scan is
scheduled on the c: drive:
The type of file system is NTFS.
Chkdsk has been scheduled manually to run on next reboot on volume C:.
- If there isn’t any scheduled scan, the message will be:
The type of the file system is NTFS.
C: is not dirty.
- To cancel a scheduled scan, type:
chkntfs /x c:
Fix #2: Another option to fix this issue is to open the Registry Editor:
- Boot into Windows
- Open the Registry Editor
- Go to this key:
HKEY_LOCAL_MACHINE\SYSTEM\CurrentControlSet\Control\Session Manager
- At the BootExecute key, check the
value.If the value is
autocheck autochk * /., you need to change it toautocheck autochk *
chkdsk won’t finish
If the utility won’t finish a scan, make sure you run the command with the /r parameter, like this:
chkdsk /r
chkdsk won’t run at startup
If the check disk won’t run a scan at startup after being scheduled to do so, follow any of the following fixes.
Fix #1: Check the BootExecute key in the Registry Editor:
- Open Registry Editor
- Find this key:
HKEY_LOCAL_MACHINE\SYSTEM\CurrentControlSet\Control\Session Manager key
- Check the value for the BootExecute
key.If the value is
autocheck autochk * /., you need to change it toautocheck autochk *
Fix #2: Run sfc
You can also run the sfc /scannow command and
then run chkdsk /r again:
- Open Command Prompt
- Type the command:
sfc /scannow
- Press Enter
- After the sfc process is complete, run the check disk utility.
More Information
Support Links
-
Easy Recovery Essentials for Windows – our repair and
recovery disk.
It’s an easy-to-use and automated diagnostics disk. It’s available for Windows 8, Windows 7 and Windows Vista. It’s also available for Windows XP and Windows Server.Read more at Windows Recovery Disks.
- The NeoSmart Support Forums, member-to-member technical support and troubleshooting.
- Get a discounted price on replacement setup and installation discs: Windows XP, Windows Vista, Windows 7, Windows 8, Windows 10.
Applicable Systems
This Windows-related knowledgebase article applies to the following operating systems:
- Windows XP (all editions)
- Windows Vista (all editions)
- Windows 7 (all editions)
- Windows 8 (all editions)
- Windows 8.1 (all editions)
- Windows 10 (all editions)
- Windows Server 2003 (all editions)
- Windows Server 2008 (all editions)
- Windows Server 2012 (all editions)